
⚡ Quick Summary: How to find cache in Chrome
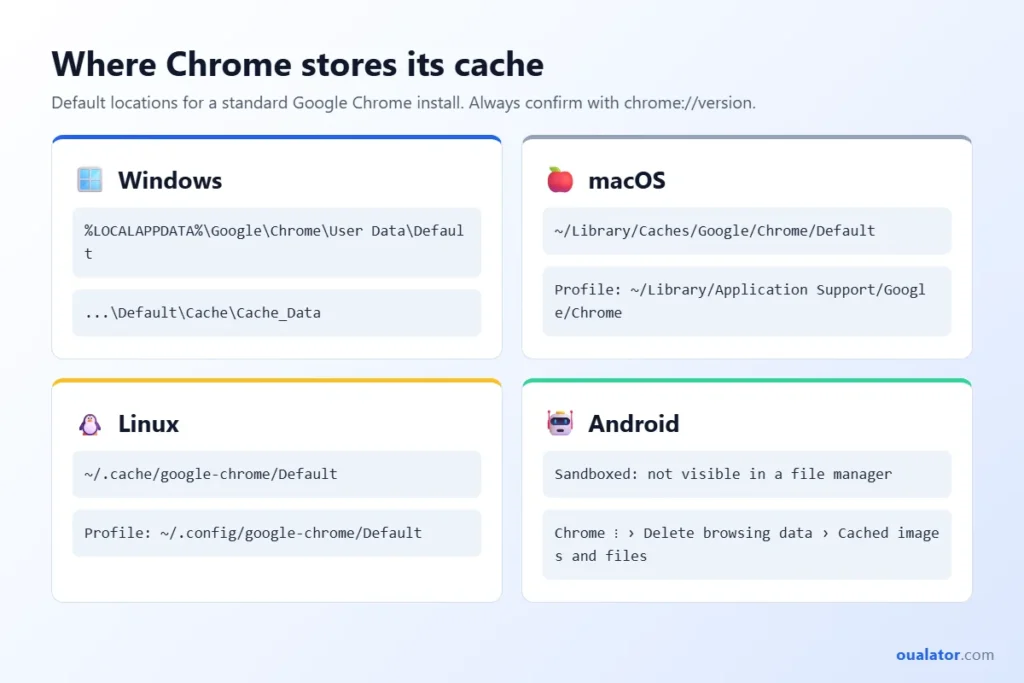
Open chrome://version and copy the Profile Path to see which profile folder Chrome is using. On Windows, the cache usually sits inside that profile under Cache\Cache_Data; on macOS it lives in ~/Library/Caches/Google/Chrome; on Linux in ~/.cache/google-chrome. Android keeps it sandboxed, so you manage it from Chrome’s settings instead. To inspect cached files for one website, use DevTools (Network and Application panels). And remember: finding the cache does not mean you have to delete it.
Google Chrome stores temporary files on your device whenever you browse the internet. These files include website images, scripts, stylesheets, and other resources that help pages load faster when you visit them again.
However, there are times when you may need to locate these files manually. Perhaps you want to recover a cached image, investigate how much storage Chrome is using, troubleshoot a website that refuses to display updated content, or simply understand where your browser saves temporary data.
The good news is that Chrome provides several ways to access and inspect cached information. You can use its built-in settings, Developer Tools, or your operating system’s file manager to locate the relevant data.
In this guide, we will explain how to find cache in Chrome using different methods, including the exact folder locations for Windows, macOS, and Linux. We will also cover Android, explain how to inspect website resources, and clarify some common misunderstandings about browser cache.
One important distinction: Finding cached files and clearing them are two different tasks. You do not need to delete everything just because you want to see where Chrome stores its cache.
Let’s explore each method.
Table of Contents
Understanding How Chrome Cache Works
Before looking for the actual files, it helps to understand what browser cache means.
Chrome uses caching to save copies of certain website resources locally on your device. Instead of downloading the same images, CSS files, JavaScript resources, and other content every time you revisit a website, Chrome can reuse previously downloaded versions when their caching rules allow it.
For example, imagine visiting an online shopping website for the first time. Chrome may download its logo, product images, fonts, and design files. When you open the same website the next day, some of those resources may already be available locally.
This reduces unnecessary downloads and can improve page loading performance.
What information does Chrome cache?
Chrome can store several types of temporary website resources:
- Images: Website logos, banners, thumbnails, and product photographs.
- JavaScript files: Scripts responsible for interactive website features.
- CSS files: Stylesheets controlling website layouts, colours, and typography.
- Fonts: Web fonts used to display website text.
- Other resources: Certain media, documents, and network responses, depending on their caching rules.
However, not every website resource is necessarily saved. Websites can control caching behaviour through HTTP headers, while browser policies and storage limits also influence what remains available.
Where does Chrome save cached information?
The exact location depends on your operating system, Chrome profile, installation channel, and configuration.
For instance, Windows normally keeps Chrome’s user data under the Local AppData directory, whereas macOS and Linux use separate cache directories.
Chrome also supports multiple user profiles. Therefore, the cache belonging to your personal profile may be different from the cache used by another profile on the same computer.
This is why checking the actual profile path is more reliable than blindly opening a default folder.
The Quickest Way to Find Chrome Cache
If you want to locate your current Chrome profile without searching through multiple folders, there is a simple built-in method.
You can use Chrome’s internal version information page.
Follow these steps:
- Open Google Chrome on your computer.
- Click the address bar at the top.
- Type
chrome://version. - Press Enter.
- Look for the field labelled Profile Path.
- Copy the displayed folder location.
This field identifies the profile currently being used by Chrome.
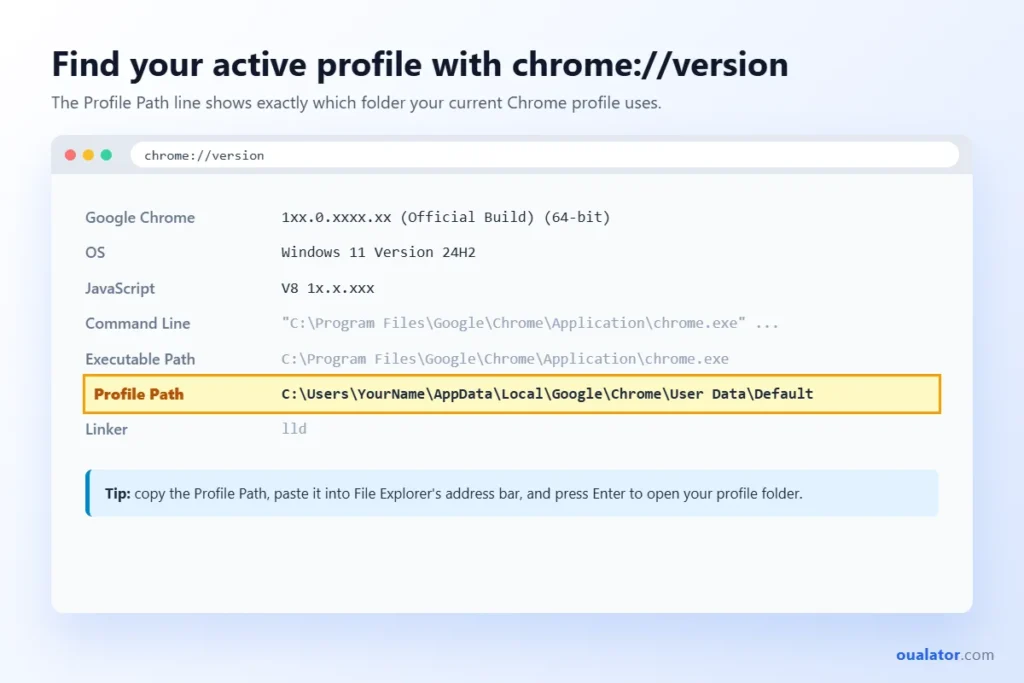
For example, a Windows installation may display a path similar to:
C:\Users\YourName\AppData\Local\Google\Chrome\User Data\DefaultThe Default folder represents the profile in this example. If you use another profile, the folder could instead be named Profile 1, Profile 2, or something similar.
Important: The Profile Path is not necessarily the exact disk-cache directory. It identifies your active Chrome profile, which helps you establish the correct location for the corresponding browser data.
We will use this information in the following methods.
How to Find Cache in Chrome on Windows
Windows users have several options for locating Chrome’s temporary files. You can start with the actual profile path or navigate directly to Chrome’s default user-data directory.
Here are three practical methods.
Method 1: Using chrome://version
Step 1: Open Chrome’s version information page.
Open Chrome and enter the following address:
chrome://versionPress Enter to display the browser’s installation and profile information.
Step 2: Locate the Profile Path.
Scroll through the information until you find the Profile Path field.
It should display a folder similar to:
C:\Users\YourName\AppData\Local\Google\Chrome\User Data\DefaultStep 3: Open the profile directory.
Copy the complete path.
Next, open File Explorer by pressing:
Windows + EClick the address bar, paste the copied path, and press Enter.
You should now be inside the active Chrome profile directory.
Step 4: Identify the cache directory.
Depending on the Chrome version and storage implementation, cached resources may be stored in directories such as Cache or Cache\Cache_Data.
Look for the relevant cache directory within the corresponding profile or its associated cache location.
This approach is particularly useful when you have multiple Chrome profiles because it helps you avoid opening the wrong one.
Method 2: Using File Explorer
If you are using the standard Google Chrome installation on Windows, you can navigate to its default user-data directory directly.
Follow these steps:
- Close Google Chrome completely.
- Press
Windows + Eto open File Explorer. - Click the address bar.
- Paste the following location:
%LOCALAPPDATA%\Google\Chrome\User Data- Press Enter.
- Open the
Defaultfolder if you use the default Chrome profile. - Locate the relevant cache directory.
If your computer has multiple Chrome profiles, you may see folders such as:
Default
Profile 1
Profile 2
Profile 3
Open the profile you actually use.
Why close Chrome first?
Chrome can actively read and write files while it is running. Closing the browser reduces the possibility of interfering with files that are currently in use.
You should also avoid manually deleting individual files from these directories unless you understand their purpose.
Method 3: Finding the Cache Folder Manually
Sometimes, the usual location does not work. This can happen if Chrome was installed using a different channel, a custom user-data directory, or an administrator-managed configuration.
In such situations, you should not assume that every installation uses the same folder.
Instead, follow this process:
- Open Chrome.
- Visit
chrome://version. - Copy the Profile Path.
- Identify the profile folder shown in the path.
- Check the corresponding cache location for that installation.
For a standard Windows installation, the usual user-data directory is:
%LOCALAPPDATA%\Google\Chrome\User DataFor Chrome Beta, Dev, and Canary, the directory names differ.
For example:
%LOCALAPPDATA%\Google\Chrome Beta\User Data%LOCALAPPDATA%\Google\Chrome Dev\User Data%LOCALAPPDATA%\Google\Chrome SxS\User DataThese are default locations, not universal guarantees. A custom installation or administrator policy may change them.
A useful tip: If you cannot see the AppData folder, remember that Windows hides certain folders by default. Using %LOCALAPPDATA% in File Explorer’s address bar avoids having to reveal hidden folders manually.
How to Find Chrome Cache on Mac
macOS uses a different directory structure from Windows. Chrome’s main profile information and its disk-cache location are generally stored separately.
For a standard Chrome installation, the usual profile directory is:
~/Library/Application Support/Google/ChromeThe corresponding cache directory is generally:
~/Library/Caches/Google/Chrome/DefaultIf you use multiple Chrome profiles, replace Default with the relevant profile name.
Step-by-step instructions
Step 1: Open Finder.
Click the Finder icon in your Mac’s Dock.
Step 2: Open the Go to Folder option.
From the top menu, select:
Go > Go to Folder
You can also use the keyboard shortcut:
Command + Shift + GStep 3: Enter the cache directory.
Paste this location:
~/Library/Caches/Google/Chrome/DefaultPress Enter.
Step 4: Check the available files.
Finder should open the relevant directory if it exists.
You may find folders containing cache data and other browser-managed temporary resources.
What if the Default folder is missing?
There are several possible explanations:
- You are using another Chrome profile.
- Chrome has been configured to use a different user-data location.
- You are using Chrome Beta or another release channel.
- The cache directory has not been created or populated yet.
To identify the correct profile, open Chrome and visit chrome://version.
The Profile Path will help you identify the profile in use. You can then check the corresponding cache directory.
Remember: The Library directory is hidden in macOS by default. Using Go to Folder is usually easier than trying to reveal it permanently.
How to Find Chrome Cache on Linux
Linux users can also access Chrome’s cached files through the file manager or terminal.
For a standard Google Chrome installation, the usual disk-cache location is:
~/.cache/google-chrome/DefaultThe profile information is generally stored separately under:
~/.config/google-chrome/DefaultFor Chromium, the corresponding default locations commonly use:
~/.cache/chromium/Defaultand:
~/.config/chromium/DefaultMethod 1: Using the File Manager
- Open your Linux file manager.
- Enable the display of hidden files.
- Navigate to your Home directory.
- Open the
.cachefolder. - Find
google-chrome. - Open the
Defaultprofile directory.
You should now be able to inspect the available cache-related folders.
Method 2: Using the Terminal
If you prefer using the command line, open the Terminal application.
Enter:
cd ~/.cache/google-chrome/DefaultPress Enter.
To list the contents, run:
ls -lahThis displays the available files and directories, including their sizes and permissions.
You can also check the size of the directory using:
du -sh ~/.cache/google-chrome/DefaultThis command reports the total disk space occupied by the selected directory.
A useful distinction: Linux distributions may use custom configuration directories through environment variables such as XDG_CONFIG_HOME and XDG_CACHE_HOME. Therefore, the default paths may not apply to every installation.
How to Find Cache in Chrome on Android
Finding cache on Android is slightly different because Chrome runs inside an application sandbox.
Unlike Windows or Linux, Android does not normally expose Chrome’s private application directories through an ordinary file manager.
However, you can still manage cached browsing data directly through Chrome.
Method 1: Using Chrome Settings
Follow these steps:
- Open Google Chrome on your Android phone.
- Tap the three-dot menu in the top-right corner.
- Select Delete browsing data.
- Choose the time range you want.
- Open the additional data options.
- Locate Cached images and files.
- Review your selection before deleting anything.
This screen lets you manage the cached browsing data stored by Chrome.
You can use the same interface to clear cache without manually opening Android’s internal application folders.
Method 2: Using Android App Settings
Android also provides storage information for individual applications.
- Open your phone’s Settings application.
- Navigate to Apps or App Management.
- Find Google Chrome.
- Open its App Info page.
- Select Storage or Storage and cache.
Depending on your Android version and phone manufacturer, the labels may be slightly different.
You may see information about the application’s storage usage and available cache-clearing options.
Important: Do not confuse the Android system’s Clear Storage or Clear Data option with Clear Cache. Clearing application data can reset Chrome’s local application state and have consequences beyond removing temporary files.
Can you open Android’s actual Chrome cache folder?
Generally, no. Chrome’s private application storage is protected by Android’s sandboxing system.
Root access or specialised development tools may provide additional access in certain circumstances, but ordinary users should not expect to browse Chrome’s private cache files through a standard file manager.
This is an important difference between desktop and mobile Chrome.
How to Inspect Cache Using Chrome DevTools
If you are a website developer, designer, or someone troubleshooting a website, Chrome Developer Tools provides a more useful way to inspect cached resources.
Instead of searching through folders filled with unfamiliar files, you can examine website resources directly.
There are two different cache-related areas worth understanding:
- HTTP browser cache.
- Cache Storage, which is commonly used by web applications and service workers.
They are not the same thing.
Method 1: Inspecting Cache Storage
Step 1: Open the website.
Visit the website whose stored resources you want to inspect.
Step 2: Open Developer Tools.
On Windows or Linux, press:
Ctrl + Shift + IOn macOS, press:
Command + Option + IStep 3: Open the Application panel.
In Developer Tools, select the Application tab.
If you cannot find it, use the additional panel options.
Step 4: Open Storage.
Look for the Storage section in the sidebar.
Expand Cache Storage.
Step 5: Select a cache.
If the website has created Cache Storage entries, they will appear here.
Click an available cache to inspect its contents.
Step 6: Inspect individual resources.
Select a resource to view its associated information.
Where supported, you can inspect its headers and use the Preview tab to view its content.
This is particularly useful for understanding how websites built as Progressive Web Apps manage offline resources.
Method 2: Inspecting HTTP Cache Through the Network Panel
HTTP cache is different from Cache Storage.
To inspect it:
- Open the website.
- Launch Chrome Developer Tools.
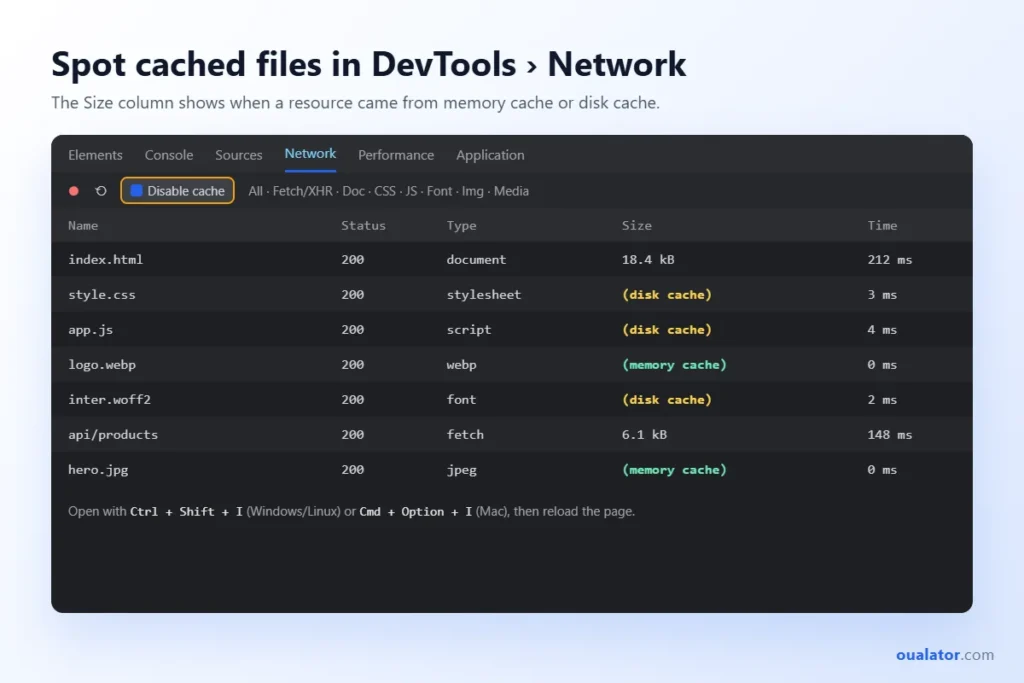
- Select the Network tab.
- Reload the webpage.
- Look at the list of network requests.
- Examine the Size column.
- Select an individual request to inspect its headers and response information.
Depending on the request and browser behaviour, the Size column may show that a resource was served from memory cache or disk cache.
This is useful when you want to understand whether Chrome is reusing previously downloaded website resources.
Method 3: Temporarily Disabling Browser Cache
Developers often need to test how a website behaves without previously cached resources.
Chrome provides an option for this.
- Open Developer Tools.
- Select the Network tab.
- Find the Disable cache checkbox.
- Enable it.
- Reload the webpage.
While Developer Tools remains open, Chrome disables its normal HTTP cache for the relevant testing session.
This is especially useful when testing:
- Updated CSS files.
- New JavaScript changes.
- Website redesigns.
- Image replacements.
- Performance improvements.
- Changes to resource loading behaviour.
Hidden tip: The Disable cache option only works while Developer Tools is open. It is not a permanent browser setting.
You can also use the Empty Cache and Hard Reload option from Chrome’s reload menu while Developer Tools is open. This forces the browser to request resources again instead of relying on the usual cached copies.
How to Find Cache for a Specific Website
Sometimes, you do not want to inspect the entire Chrome cache. You only want to find resources associated with one particular website.
For example, you might want to check whether a website is loading an old logo or using an outdated stylesheet.
Chrome DevTools is generally the most practical option.
Follow these steps
- Open the website in Chrome.
- Press
Ctrl + Shift + Ion Windows orCommand + Option + Ion Mac. - Open the Network tab.
- Reload the webpage.
- Use the request filters to narrow down the resources.
- Select an image, script, stylesheet, or other request.
- Examine its response details.
You can filter requests by resource type, such as:
- All
- Fetch/XHR
- JS
- CSS
- Img
- Media
- Font
- Doc
The available filters help you identify the type of resource you are investigating.
For example, if a website continues showing an old image, select the relevant image request and inspect its response and caching information.
What if the resource does not appear?
There are several reasons why a resource might not appear in the Network panel:
- The resource was not requested during the recorded page load.
- The request was served through a different mechanism.
- A service worker intercepted the request.
- The relevant cache entry has expired or been removed.
- You are inspecting the wrong page or browser profile.
For a more complete investigation, check the Application panel as well as the Network panel.
This distinction is particularly important when dealing with Progressive Web Apps, because their Cache Storage entries are managed separately from the ordinary HTTP cache.
Chrome Cache vs Cookies vs Browsing History
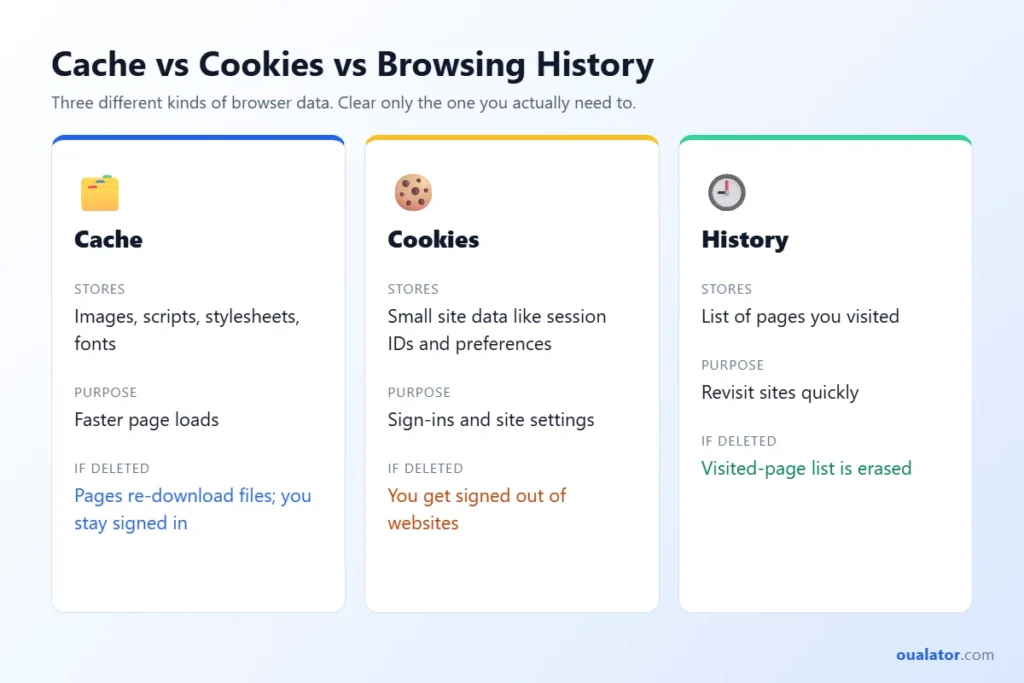
Many people assume that cache, cookies, and browsing history are the same thing. However, they serve different purposes.
Understanding the differences can help you avoid deleting information unnecessarily.
| Data type | What it stores | Main purpose |
|---|---|---|
| Cache | Website resources such as images, scripts and stylesheets | Faster loading |
| Cookies | Small pieces of website-related data | Sessions, preferences and other site functions |
| Browsing history | Records of visited pages | Helps users revisit websites |
| Site data | Information stored by websites, including local storage and other storage mechanisms | Website functionality and persistence |
| Download history | Records of downloaded files | Tracks previous downloads |
1. Browser Cache
Cache contains reusable resources downloaded from websites.
For example, an image that you see on a website may have a cached copy stored locally.
Removing cached resources generally means Chrome must download them again when required.
2. Cookies
Cookies are small pieces of data created by websites.
They can store information such as session identifiers and preferences.
For example, a website may use a cookie to recognise that you have already signed in.
Deleting cookies can sign you out of websites or reset certain website preferences.
3. Browsing History
Browsing history records the websites and pages you have visited.
Deleting browsing history does not automatically mean that every cached resource or website storage entry has been removed.
The important point: If your only goal is to fix an outdated webpage or remove temporary website files, you generally do not need to delete your entire browsing history.
How to Clear Chrome Cache Safely
Now that you know where Chrome stores its cache, you may also want to remove unnecessary cached files.
Chrome offers a built-in method that is safer and easier than manually deleting files from its internal directories.
Step 1: Open Chrome
Launch Google Chrome on your computer.
Step 2: Open Delete Browsing Data
Click the three-dot menu in the top-right corner.
Select:
Delete browsing data
You can also open the dialog using:
Ctrl + Shift + DeleteOn macOS, use:
Command + Shift + DeleteStep 3: Choose the Time Range
Chrome allows you to choose a time range.
Common options include:
- Last 15 minutes.
- Last hour.
- Last 24 hours.
- Last 7 days.
- Last 4 weeks.
- All time.
Choose the period that matches your requirements.
Step 4: Select Cached Images and Files
Review the available data categories.
Select Cached images and files.
If you only want to clear cached resources, avoid selecting cookies or other site data unless you have a specific reason.
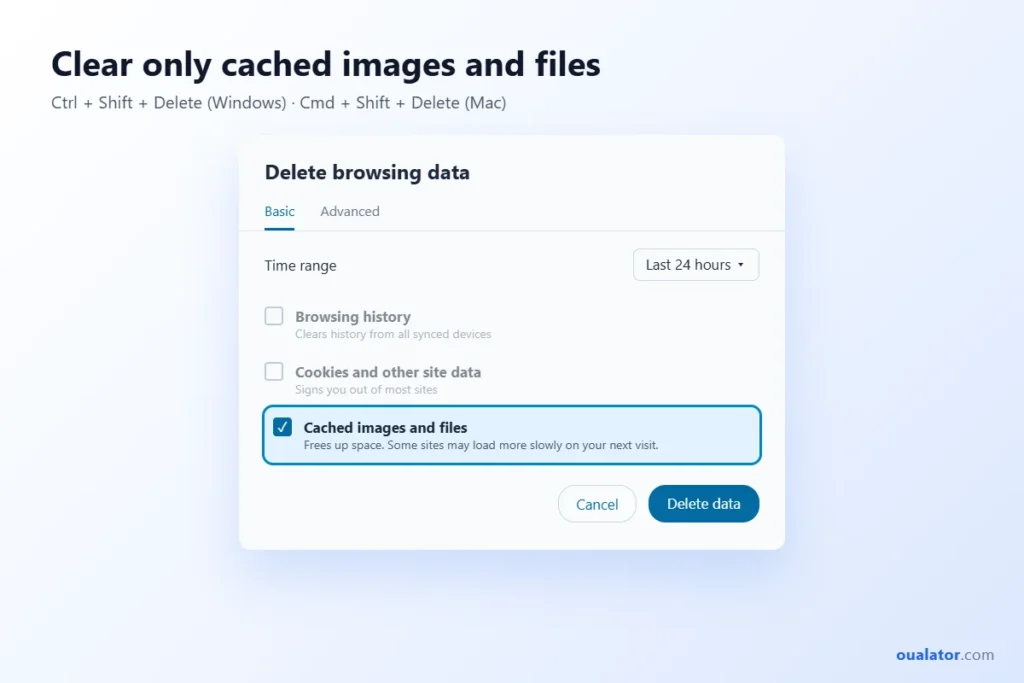
Step 5: Delete the Selected Data
Click Delete data.
Chrome will remove the selected information within the chosen time range.
You may notice that some websites load slightly slower the first time you revisit them because their resources need to be downloaded again.
Should you clear Chrome cache regularly?
Not necessarily.
Chrome manages cached resources automatically, and regularly deleting everything is not always beneficial.
You should consider clearing it when:
- A website displays outdated content.
- Website images or layouts are not loading correctly.
- A webpage repeatedly displays an older version after an update.
- You need to troubleshoot a browser-related problem.
- You want to investigate local storage usage.
If everything is working properly, there is usually no need to clear your cache simply because some space is occupied.
Why You Cannot Find Chrome Cache
Even after following the instructions, you may sometimes find that the expected cache folder is missing.
This does not necessarily indicate a problem with Chrome.
Here are some common reasons.
1. You Are Checking the Wrong Profile
Chrome allows users to create multiple profiles.
Each profile can have its own browsing data and associated storage.
If you are checking the Default folder while using Profile 1, you may be looking in the wrong place.
Solution: Open chrome://version and verify the Profile Path.
2. You Are Using a Different Chrome Installation
Chrome Stable, Beta, Dev, and Canary can use different directories.
Therefore, a folder associated with the Stable version may not contain the cache belonging to your Beta installation.
Solution: Check the actual browser channel and Profile Path.
3. The Cache Has Already Been Cleared
Chrome may remove cached resources when they expire, become unnecessary, or are removed through browser settings.
If the cache was recently cleared, the expected files may no longer exist.
Solution: Visit a few websites and inspect the relevant directories again after resources have been downloaded.
4. You Are Looking for HTTP Cache in Cache Storage
This is one of the most common misunderstandings.
The Application panel’s Cache Storage section does not represent the entire HTTP browser cache.
Cache Storage is a separate web platform storage mechanism commonly used by service workers.
Solution: Use the Network panel to inspect HTTP caching behaviour.
5. Chrome Is Using a Custom Profile Location
Some users, particularly developers and managed business environments, configure Chrome to use custom directories.
In these situations, the standard paths may not be correct.
Solution: Use chrome://version to identify the active profile rather than relying exclusively on default folder locations.
6. You Are Using Android
Android protects application-private directories.
As a result, a regular file manager cannot normally browse Chrome’s private cache directory.
Solution: Use Chrome’s Delete browsing data interface or Android’s application storage settings.
An Easier Way to Manage Browser Storage
Manually locating browser cache directories is useful when you need to inspect specific resources or troubleshoot a technical issue.
However, it can become inconvenient if your actual goal is to understand and manage unnecessary storage across your computer.
Different applications create temporary files, cached resources, logs, and other data in separate directories. Finding everything manually can take considerable time, particularly if you are unfamiliar with Windows storage locations.
An alternative is Oualator Storage Doctor, which provides a more convenient approach to identifying and managing storage-related clutter.
Instead of manually searching through multiple application folders, you can use a dedicated storage-management solution to help investigate unnecessary files and understand where disk space is being used.
It is worth remembering that browser cache is only one part of your computer’s overall storage usage. Other applications and Windows itself can also accumulate temporary data. Graphics drivers keep their own caches too (see our guide on how to clear NVIDIA shader cache), and Microsoft Store apps can quietly fill the WindowsApps folder.
Our recommendation: Use Chrome’s built-in tools when you specifically need to inspect browser resources. Consider a broader storage-management solution when your objective is to identify unnecessary files across your computer.
Frequently Asked Questions
1. Where is Chrome cache stored on Windows?
For a standard Windows installation, Chrome’s user-data directory is generally located at:
%LOCALAPPDATA%\Google\Chrome\User DataThe default profile is usually named Default. The exact cache location depends on the Chrome version and storage implementation.
2. Can I see cached files directly in Chrome?
Yes, but the available information depends on what you want to inspect.
Chrome DevTools allows you to inspect HTTP cache activity through the Network panel and Cache Storage through the Application panel.
However, Chrome does not provide a general-purpose file browser for all its internal disk-cache files.
3. How do I find cache in Chrome without opening File Explorer?
You can use Chrome Developer Tools.
Open the website, press Ctrl + Shift + I, and select the Network tab.
Reload the page and inspect the resources and their loading information.
You can also use the Application panel to inspect Cache Storage entries.
4. Does clearing Chrome cache delete passwords?
No, selecting only Cached images and files does not normally delete saved passwords.
However, you should review the selected data categories before confirming deletion. Passwords and other browsing information have separate controls.
5. Does Chrome cache take up storage space?
Yes. Chrome stores temporary resources on your device, and their combined size can occupy disk space.
The actual amount varies according to browsing activity, websites visited, cache policies, and browser settings. If you want a feel for how storage figures add up, our guide on how many GB 1000 photos take puts common file sizes into perspective.
6. Can I recover deleted Chrome cache files?
There is no guaranteed recovery method.
Once Chrome deletes cached resources, it may remove the files permanently or reuse the associated storage.
You may be able to download the resources again by revisiting the original website, provided they are still available.
7. Does Incognito mode save Chrome cache?
Incognito sessions handle browsing data differently from regular sessions.
Chrome may temporarily store resources during an active Incognito session to support browsing performance. However, much of the session’s local browsing data is removed when all Incognito windows are closed.
You should not treat Incognito mode as a guarantee that no temporary data is written to the device.
8. Is Chrome cache the same as Google Chrome history?
No.
Chrome cache stores reusable website resources, while browsing history records websites and pages you have visited.
They are separate categories of browser data and can be managed independently.
9. How can I find the Chrome cache size?
On Linux, you can use the du -sh command on the relevant cache directory.
On Windows and macOS, you can inspect the folder’s properties or Get Info details, respectively.
You can also review Chrome’s storage information through the relevant browser and operating-system settings.
10. Why does Chrome download the same files again after clearing cache?
When you clear cached resources, Chrome no longer has the same reusable local copies available.
Consequently, when you revisit a website, it may need to download those images, scripts, stylesheets, and other resources again.
This is expected behaviour.
Final Thoughts
Finding Chrome’s cached files is relatively straightforward once you understand how browser profiles and storage directories work.
For Windows users, chrome://version is one of the most reliable starting points. macOS and Linux users can inspect their respective cache directories, while Android users can manage cached browsing data through the browser and operating-system settings.
If you are investigating website behaviour, Chrome DevTools provides more detailed information than manually browsing through internal files. The Network panel helps inspect HTTP caching, while the Application panel lets you examine Cache Storage.
Most importantly, remember that finding cache does not mean you need to delete it. Chrome manages much of its temporary storage automatically, so only remove cached data when you have a clear reason.
Choose the method that matches your objective, and you can inspect or manage Chrome’s storage without accidentally removing information you intended to keep.