Quick Summary: npm cache folder too big
npm keeps a shared cache of every package it downloads in %LocalAppData%\npm-cache on Windows or ~/.npm on macOS and Linux. It never deletes old entries on its own, so it grows with every install and npx run. Clearing it is safe: run npm cache verify to garbage-collect, or npm cache clean --force to wipe it. Your projects and node_modules are not touched; packages simply download again on the next install.
Table of Contents
Have you ever checked your computer’s storage and discovered that the npm cache folder is consuming several gigabytes of disk space? If you regularly work with Node.js, React, Next.js, Vue, Angular, or other JavaScript frameworks, you may eventually encounter this problem.
The surprising part is that you don’t necessarily need to have dozens of active projects for this to happen. Even after deleting old projects, uninstalling dependencies, or removing unused applications, the npm cache can continue occupying a significant amount of storage.
For developers working with multiple projects, the problem can become particularly frustrating. Every time you install packages, update dependencies, execute certain development tools, or download packages through npm, additional data may be stored in its cache directory.
But what exactly is npm storing? Why doesn’t npm automatically remove old cached files? Is it safe to delete the entire folder? And how can you prevent it from growing excessively in the future?
This guide answers these questions and explains several practical ways to investigate, clean, and manage an oversized npm cache folder on Windows, macOS, and Linux.
1. What Is the npm Cache Folder?
npm (Node Package Manager) is the default package manager distributed with Node.js. Developers use it to download, install, update, and manage JavaScript packages required by their applications.
Whenever you execute commands such as:
npm install
npm install react
npm install express
npm update
npx create-react-app my-app
npm may download package information, compressed package archives, and other HTTP-related data from the npm registry.
Instead of downloading everything repeatedly, npm stores relevant information in a local cache directory.
The next time you request the same package or resource, npm may reuse the cached information instead of downloading it again.
This makes package installation more efficient, particularly when working on multiple projects that share dependencies.
However, there is a downside: npm does not automatically remove cached data simply because you have stopped using a package or deleted a project.
According to npm’s documentation, its cache is designed to grow as new package data is added. npm does not automatically impose a general storage limit or periodically clear the entire cache.
Over time, this can result in an npm cache folder that occupies hundreds of megabytes or even several gigabytes.
What does npm actually store?
The npm cache generally contains:
- Downloaded package data.
- HTTP request and response information.
- Package metadata.
- Cached registry responses.
- Integrity information.
- Data associated with package retrieval.
Modern npm versions use a content-addressable cache called _cacache to organize this information.
You might see a directory structure similar to:
npm-cache/
│
├── _cacache/
│   ├── content-v2/
│   ├── index-v5/
│   └── tmp/
│
└── _logs/
The exact structure can vary between npm versions.
The important thing to understand is that these folders are not your installed project dependencies. They contain cached information that npm can download again when necessary.
2. Where Is the npm Cache Folder Located?
Before deleting anything, you should identify the exact location of the npm cache directory.

The location depends on your operating system and npm configuration.
Windows
The default npm cache location on Windows is:
C:\Users\YourUsername\AppData\Local\npm-cacheThe complete path is usually:
%LocalAppData%\npm-cacheInside this directory, the _cacache folder generally contains most of the package cache data.
Because the npm cache sits inside AppData\Local, it is usually one of several large folders there. If that whole folder is bloated, see our guide on AppData Local taking up too much space.
Quick method to open the folder:
- Press
Windows + R. - Type:
%LocalAppData%\npm-cache- Press Enter.
- Check the folder’s properties to see how much storage it occupies.
You can also open Command Prompt or PowerShell and execute:
npm config get cacheThis command displays the actual cache directory currently configured for npm.
Remember that your computer may use a different location if you or another application previously changed the npm cache configuration.
macOS
The default location on macOS is:
~/.npmTo open it through Terminal:
open ~/.npmTo inspect its size:
du -sh ~/.npmLinux
On most Linux distributions, npm stores its cache in:
~/.npmCheck the directory size with:
du -sh ~/.npmTo find the configured location on any of these operating systems, use:
npm config get cacheThis is more reliable than assuming npm is using its default location.
3. Why Is Your npm Cache Folder Getting So Big?
Understanding the causes is important because deleting the cache might solve the immediate storage problem, but it won’t necessarily prevent it from happening again.
Here are some of the most common reasons.
A. Installing Dependencies Across Multiple Projects
Imagine that you are developing five different applications:
- A React application.
- A Next.js website.
- An Express.js API.
- A Vue.js application.
- A Vite-based dashboard.
Each application may require dozens or hundreds of npm packages.
Some dependencies are shared between projects, while others are unique.
npm can reuse cached package data when appropriate, but newly requested versions and package resources can add more data to the cache.
If you frequently install, update, and experiment with different dependencies, the cache can gradually become larger.
B. Frequently Using npx
The npx command is commonly used to execute packages without manually installing them globally.
For example:
npx create-vite my-projectOr:
npx create-next-app@latestWhen a required package is not already available, npm may download it for execution.
Depending on the command and npm version, temporary package installations and related cached data can contribute to storage usage.
If you frequently test different frameworks, command-line tools, and project generators, this can add to the accumulated storage.
C. Installing Different Versions of the Same Package
Consider a situation where you work on several projects.
One project requires React 18, another uses React 19, and an older application uses a different dependency version.
You may also experiment with different versions of TypeScript, Vite, Webpack, ESLint, or other development tools.
npm may retain cached package data associated with different versions.
Consequently, repeatedly switching between package versions can increase the amount of stored cache data.
D. Removing Projects Does Not Automatically Remove the npm Cache
This is one of the most misunderstood aspects of npm storage management.
Suppose you created ten React projects and later deleted eight of them.
You might expect npm to remove all the downloaded package data associated with those deleted projects.
However, the npm cache is maintained separately from individual project directories.
Deleting a project removes its local files, such as its node_modules folder, but it does not automatically remove the shared npm cache.
This is why developers sometimes discover a large npm cache even when they no longer have many projects on their computers.
E. The Cache Does Not Have an Automatic Size Limit
Another important detail is that npm does not provide a general automatic cache-size limit that periodically removes old entries.
Its cache is designed primarily for performance and integrity rather than automatic storage optimization.
As a result, the folder may continue growing as you work on additional applications.
This does not necessarily indicate a problem with npm. It is part of how the caching system is designed.
4. How to Check the npm Cache Folder Size
Before cleaning the cache, check how much space it is actually consuming.
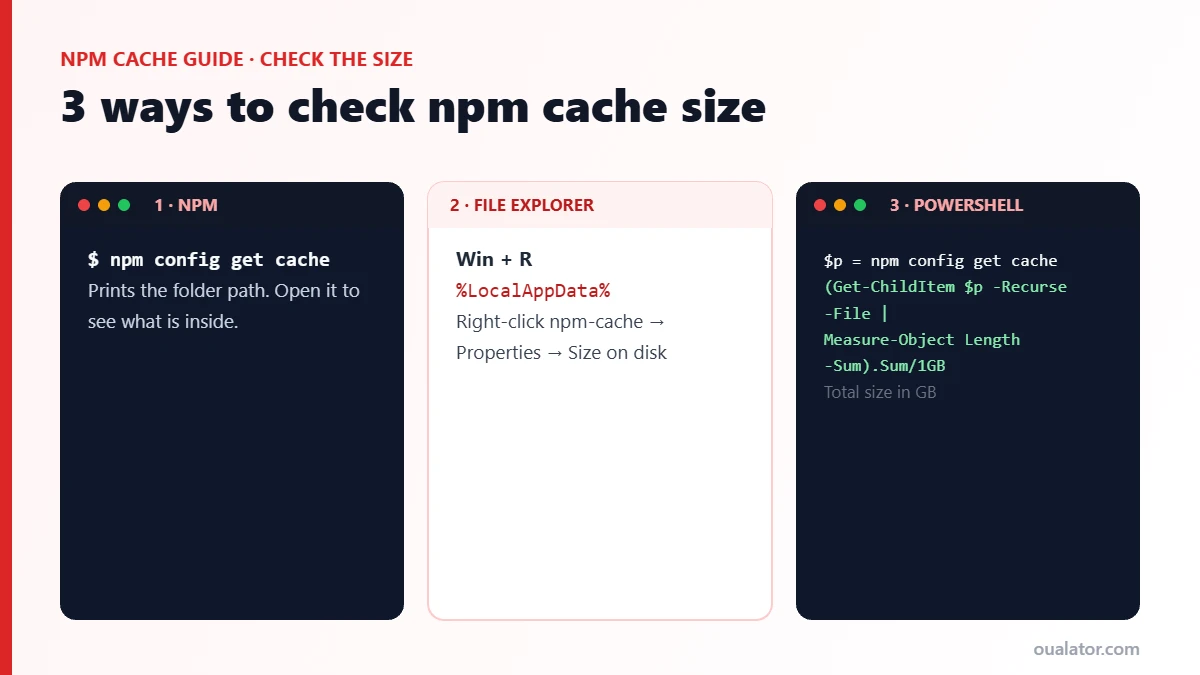
Method 1: Use the npm Command
Open Command Prompt, PowerShell, or Terminal and execute:
npm config get cacheThis identifies the cache directory.
Next, execute:
npm cache verifyThis checks the integrity of cached content and performs garbage collection of unnecessary cache data.
The output provides information about the cache verification process, including content and index information.
This is a good first step before performing a complete cleanup.
Method 2: Check Through Windows File Explorer
On Windows:
- Open File Explorer.
- Navigate to
%LocalAppData%. - Find the
npm-cachefolder. - Right-click it.
- Select Properties.
- Wait for Windows to calculate its total size.
This gives you a straightforward measurement of the disk space consumed by the folder.
Method 3: Check Through PowerShell
If you want to calculate the folder size without opening File Explorer, use:
$path = (npm config get cache).Trim()

$size = (Get-ChildItem $path -Recurse -File -Force |
    Measure-Object -Property Length -Sum).Sum

"{0:N2} GB" -f ($size / 1GB)
This calculates the total size of files inside the configured cache directory.
Important: Run this before and after cleaning to compare the results.
5. How to Clear the npm Cache Safely (Recommended Method)
If your npm cache folder is too big, the simplest solution is to use npm’s built-in cache management commands.
There are two commands worth understanding.
Step 1: Verify and Clean Unnecessary Cache Data
Recommended first step
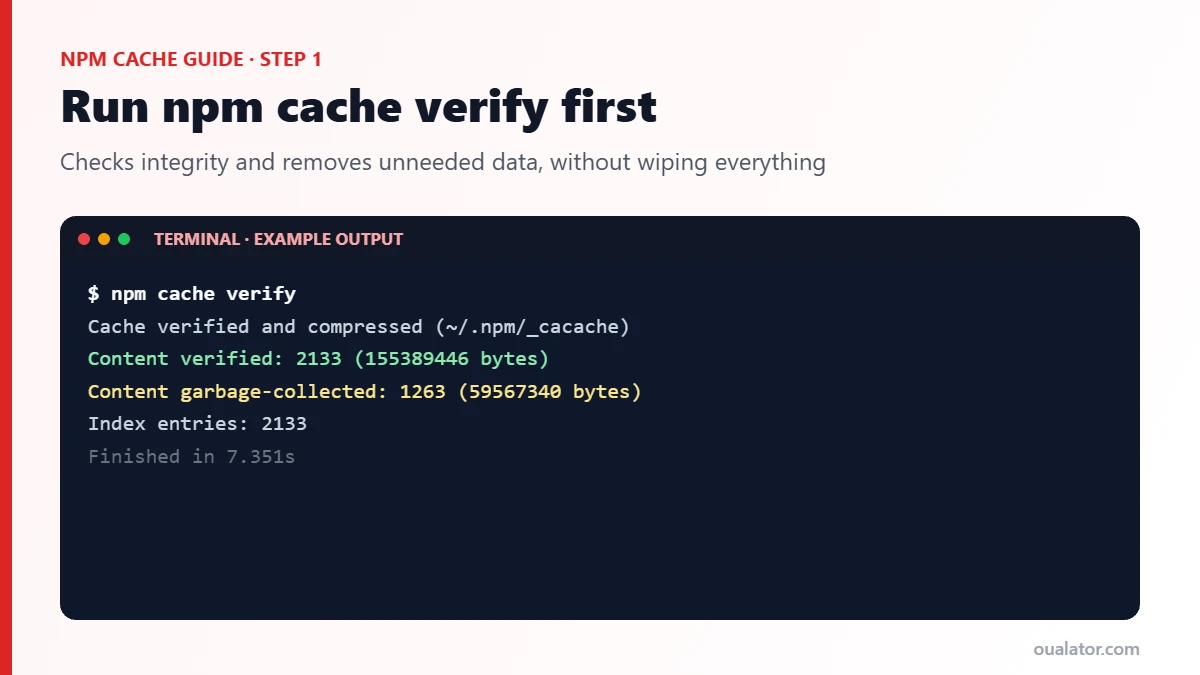
Execute:
npm cache verifyThis command checks the existing cache and removes unnecessary or unneeded cache entries through garbage collection.
It also verifies the integrity of cached content and its index.
Unlike a complete cache deletion, this approach allows npm to retain valid cache entries.
Why should you try this first?
Because npm uses a self-healing cache system. Cached data is integrity-checked, and npm can retrieve package data again when necessary.
You do not need to delete everything just because the folder looks large.
Step 2: Completely Clear the npm Cache
If the cache still occupies too much storage and you want to reclaim the space, you can remove its contents.
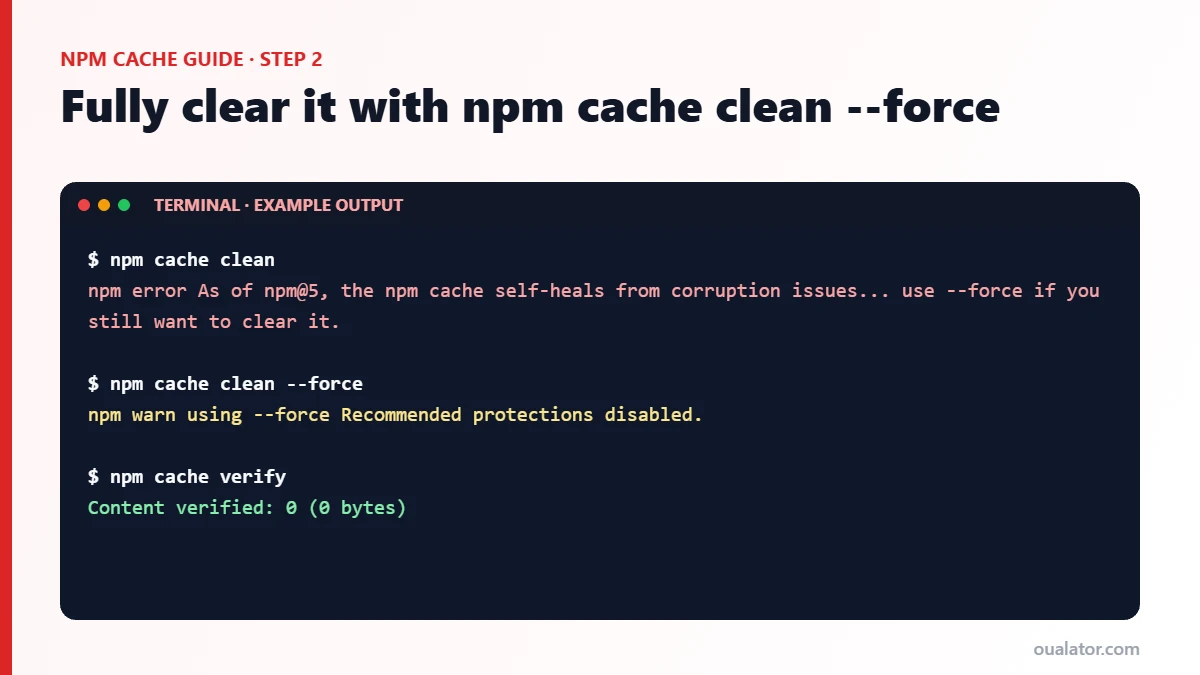
Execute:
npm cache clean --forceThe --force option is necessary because npm protects against unnecessary cache deletion.
After executing this command, npm removes cached data from its configured cache directory.
You may notice that the next package installation takes slightly longer because npm needs to download the required packages again.
For example:
npm installnpm will fetch any required packages that are no longer available in the cache.
Is this command safe?
Generally, yes. Clearing the npm cache does not uninstall Node.js, delete your project files, remove your package.json, or automatically delete your existing node_modules folders.
However, there is one important consideration: if you regularly work offline or have limited internet connectivity, deleting the cache may make subsequent installations difficult until the required packages can be downloaded again.
Step 3: Verify That the Cache Has Been Cleared
After cleaning, execute:
npm cache verifyYou can also check the configured directory again:
npm config get cacheThen inspect its size through File Explorer or your operating system’s storage tools.
You should see a substantial reduction if the cache was previously consuming significant space.
6. How to Delete the npm Cache Folder Manually on Windows
Sometimes you may want to remove the cache directory manually, particularly when troubleshooting storage issues or when a cleanup command encounters a file-locking problem.
You can do this through File Explorer or PowerShell.
Method A: Delete Through File Explorer
- Close Visual Studio Code and other development applications that may be running npm processes.
- Press
Windows + R. - Enter:
%LocalAppData%- Locate the
npm-cachefolder. - Right-click the folder and select Delete.
- Empty the Recycle Bin if you also want to reclaim the space immediately.
Note: If you have customized your npm cache location, delete the correct configured directory rather than assuming it is located in AppData.
Method B: Delete Through PowerShell
You can also use PowerShell to remove the cache directory.
First, find its location:
npm config get cacheThen, if you have confirmed the displayed path is correct, execute:
$cache = (npm config get cache).Trim()

Remove-Item -LiteralPath $cache -Recurse -Force
This removes the configured cache directory and its contents.
Important precautions:
- Close active npm installation processes first.
- Double-check the path before executing the deletion command.
- Do not run an unverified deletion command against a parent directory.
- npm may recreate its cache directory when you next use it.
If you are unsure about manual deletion, use npm cache clean --force instead.
7. How to Clear the npm Cache on macOS and Linux
The cleanup process is almost identical across Unix-based operating systems.
macOS
Open Terminal and execute:
npm cache verifyIf you want to reclaim more space:
npm cache clean --forceTo check the directory size:
du -sh "$(npm config get cache)"Linux
Open your terminal and execute:
npm cache verifyTo completely clear the cache:
npm cache clean --forceCheck its size using:
du -sh "$(npm config get cache)"If you have multiple Node.js installations or use different user accounts, remember that each account or npm configuration may have a separate cache directory.
8. npm Cache vs node_modules: What Is the Difference?
This is particularly important because developers sometimes delete the wrong folder when trying to free up disk space.
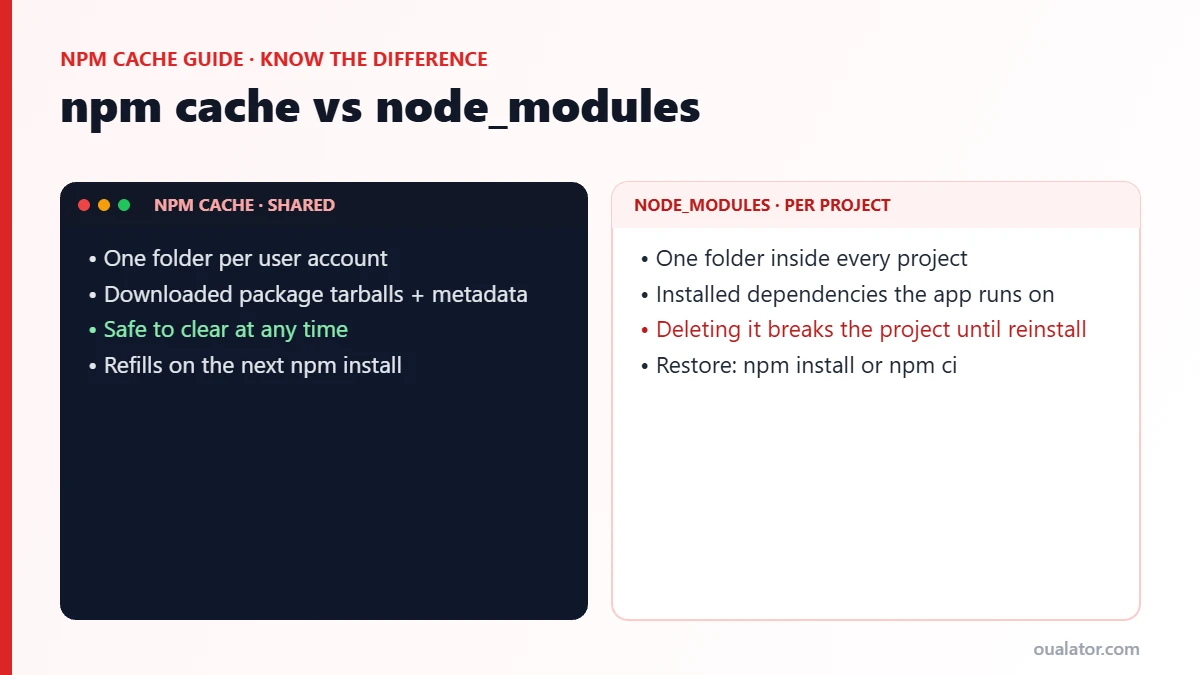
Although both directories are related to npm, they serve different purposes.
| Feature | npm cache | node_modules |
|---|---|---|
| Purpose | Stores cached package data | Stores installed project dependencies |
| Location | Shared cache directory | Inside individual projects |
| Shared between projects | Usually yes, for the same npm cache | No, each project has its own |
| Required to run an existing project | No | Usually yes |
| Can be deleted? | Yes, generally safe | Yes, but dependencies must be reinstalled |
| Recreated automatically | When npm needs it | Through package installation |
What happens if you delete node_modules?
Consider a project containing:
my-project/
│
├── package.json
├── package-lock.json
├── node_modules/
└── src/
If you delete node_modules, the project will no longer have its locally installed dependencies.
However, you can generally restore them by executing:
npm installOr, when you want to reproduce the dependency tree recorded in the lockfile:
npm cinpm ci is especially useful for clean installations in CI environments and requires an existing compatible lockfile.
What happens if you delete the npm cache?
Deleting the npm cache does not normally affect existing project dependencies.
Your installed packages remain inside their respective node_modules directories.
The next time you install a dependency, npm may need to download the package again.
Hidden answer: If your main problem is a large npm cache folder, deleting every project’s node_modules folder is usually unnecessary. These are separate storage locations, and deleting the latter can create additional work without solving the actual cache problem.
9. How to Change the npm Cache Location to Another Drive
If your C: drive is running out of space, moving the npm cache to another drive can be a practical long-term solution.
For example, suppose you have:
- C: Drive – Windows and development tools.
- D: Drive – Additional storage.
You can configure npm to use a cache directory on D:.
Execute:
npm config set cache "D:\npm-cache"Check the new location:
npm config get cacheThe output should display:
D:\npm-cacheNew npm cache operations will use this configured directory.
Does changing the cache location move existing files?
No. Changing the configuration does not automatically migrate the contents of the previous cache directory.
If you want to preserve existing cached data, you need to move or copy it separately and ensure the destination has the appropriate permissions.
Otherwise, you can simply use the new location and allow npm to populate it again.
Why is this useful?
Moving the npm cache can help developers who:
- Have limited SSD storage.
- Maintain multiple JavaScript projects.
- Frequently install large dependencies.
- Work with multiple frameworks.
- Keep their development tools on a separate drive.
It is worth remembering that moving the cache does not reduce the total amount of data stored. It simply changes where npm stores it.
10. How to Prevent the npm Cache Folder from Growing Too Much
Cleaning an oversized cache solves the immediate problem, but you can also adopt better storage management practices.
Here are some useful recommendations.
A. Run Cache Verification Occasionally
You can periodically execute:
npm cache verifyThis helps verify cached data and clean up unnecessary entries.
You do not need to run it after every package installation.
B. Avoid Unnecessary Dependency Reinstallations
Developers sometimes delete node_modules and reinstall everything repeatedly, even when there is no actual dependency problem.
This is not always necessary.
Keep your dependency files organized and use the package manager commands appropriate for your workflow.
For example, use:
npm ciwhen you need a clean, lockfile-based installation.
C. Remove Unused Projects and Their Dependencies
Old development projects can consume considerably more space than the npm cache itself.
For example:
Projects/
│
├── React-App/
│   └── node_modules/
│
├── NextJS-Website/
│   └── node_modules/
│
├── Old-Dashboard/
│   └── node_modules/
│
└── Test-Application/
    └── node_modules/
If you no longer need an application, consider archiving or removing the complete project after backing up any important source files.
Remember that deleting these projects will not automatically clean the separate npm cache.
D. Keep an Eye on npx and Development Tool Caches
npm is not the only application that can consume storage during JavaScript development.
Other tools may maintain their own caches, including:
- Vite.
- Next.js.
- Webpack.
- TypeScript-related tooling.
- Browser automation frameworks.
- Build and testing tools.
For example, Next.js commonly creates a .next directory inside a project, which contains build output and development-related data.
These folders should not be confused with npm’s shared cache.
If you also run containers, Docker can grow far larger than npm. Our guide on Docker Desktop eating disk space shows how to prune images and shrink its virtual disk.
Before deleting anything, identify which application owns the directory.
E. Monitor Your Development Storage
If you regularly build applications, make it a habit to inspect your storage usage.
A large development environment can contain several different types of data:
- npm cache.
- node_modules.
- Build output.
- Temporary files.
- Application logs.
- Browser caches.
- Downloaded SDKs and tools.
Cleaning only one directory may not resolve a larger storage problem.
11. An Easier Way to Find and Clean Unnecessary Storage
The manual methods described above work well when you already know which folder is consuming storage.
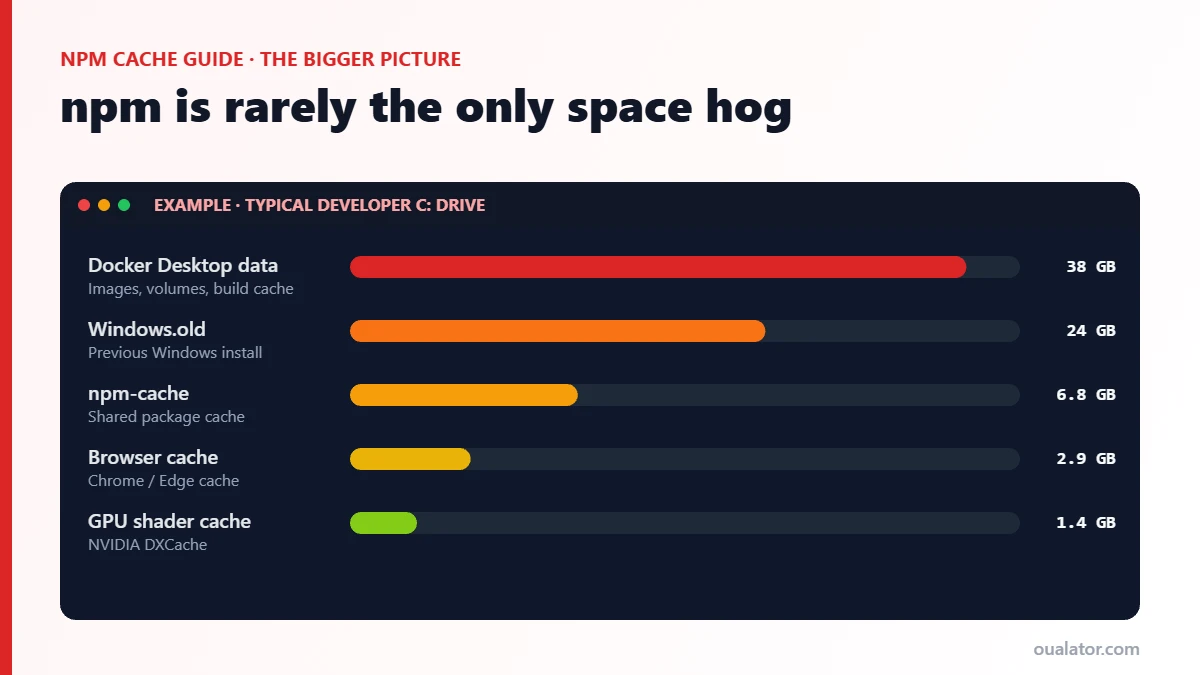
However, what if your npm cache is only one of several large directories on your computer?
You might also have unnecessary temporary files, old application data, accumulated development files, logs, and other storage-consuming folders. Common examples are Chrome’s browser cache, the NVIDIA shader cache, the WindowsApps folder and a leftover Windows.old folder.
Manually navigating through Windows directories and checking each folder’s properties can become time-consuming.
This is where a dedicated storage analysis and cleanup utility can be useful.
Oualator Storage Doctor does this for you. It is free for Windows 10 and 11, scans your drives, shows large folders such as npm-cache, Docker data and browser caches in one view, and explains what is safe to remove before you delete anything.
Regardless of which approach you choose, make sure you understand what a folder contains before removing it. A storage cleanup utility should complement careful file management, not replace it.
12. Common npm Cache Errors and Troubleshooting
Sometimes, an oversized cache is accompanied by npm errors. Here are several situations you might encounter.
Error 1: npm cache clean refuses to run
You may receive a message explaining that npm refuses to delete the cache without force.
Solution:
npm cache clean --forceThis is expected behavior in modern npm versions.
Error 2: EPERM or EBUSY During Cleanup
On Windows, you might encounter errors such as:
npm ERR! code EPERMOr:
Error: EBUSY: resource busy or lockedThese errors can occur when another process is using files inside the cache directory.
Possible solutions:
- Close Visual Studio Code and other development tools.
- Stop running npm installations or development processes.
- Close terminals that are performing package operations.
- Check whether another application is accessing the cache.
- Retry the cleanup.
Antivirus software or background processes can also temporarily lock files.
Error 3: ENOSPC – No Space Left on Device
You may see:
npm ERR! ENOSPC: no space left on deviceThis generally indicates that npm cannot write the required data because the destination filesystem has insufficient available space or has reached a relevant resource limit.
Possible solutions:
- Free up disk space.
- Check the temporary directory’s available storage.
- Move the npm cache to a drive with more free space.
- Check filesystem quotas and permissions.
- Retry the installation.
On Windows, also check whether your system drive has sufficient free space.
Error 4: npm Install Becomes Slower After Cleaning
This is normal.
When you remove the cache, npm may have to download packages again instead of reusing locally stored data.
The time required depends on your internet connection, the number of dependencies, and the registry response time.
It does not necessarily mean that your npm installation is damaged.
Error 5: npm Cache Verification Reports Problems
Try:
npm cache verifyThe command checks the cache and performs garbage collection.
If you are still experiencing problems and have sufficient internet access, you can perform a complete cleanup:
npm cache clean --forceThen retry the package installation.
13. Frequently Asked Questions (FAQs)
1. Why is my npm cache folder so big?
Your npm cache grows as npm downloads and stores package data, metadata, and HTTP-related resources. It does not automatically remove all older cached data when you uninstall packages or delete projects. Frequent installations, version changes, and development experiments can contribute to its growth.
2. Is it safe to delete the entire npm cache folder?
Generally, yes. The npm cache is not your application’s installed dependency directory. npm can download required package data again when needed. However, you should avoid deleting it during an active installation and should consider whether you need cached packages for offline development.
3. Does clearing npm cache delete node_modules?
No. The npm cache and node_modules are separate directories. Running npm cache clean --force removes cached data but does not automatically uninstall dependencies from your existing projects.
4. How often should I clear npm cache?
There is no universal schedule. Most developers do not need to clear the cache regularly. Use npm cache verify when you want to check and clean unnecessary cache data. Use a complete cleanup when reclaiming disk space is more important than retaining cached downloads.
5. Why does npm cache keep growing after deleting projects?
Because npm maintains a shared cache independently of individual project directories. Deleting a project removes its local files, but the cached package data remains available until npm’s cache management process removes it or you clear it manually.
6. Can I move npm cache from C: to D:?
Yes. Execute:
npm config set cache "D:\npm-cache"Then verify the new location:
npm config get cacheThis changes the configured location for future cache operations. It does not automatically move the old cache contents.
7. What is the difference between npm cache clean and npm cache verify?
npm cache verify checks cache integrity and removes unnecessary data through garbage collection while retaining valid cache entries.
npm cache clean --force removes cached data so npm can fetch it again when required.
For routine maintenance, verification is generally the better first choice.
8. Will clearing npm cache break React or Next.js projects?
Clearing the npm cache does not normally break existing React or Next.js projects because their installed dependencies are stored in their respective node_modules folders.
You may need to download dependencies again during a future installation.
9. Can npm cache take 10 GB or more?
Yes, it is possible for an npm cache to become very large, especially in environments with extensive package installation activity. However, there is no standard size that every developer should expect. The actual size depends on usage, package versions, downloaded data, and cache configuration.
10. Can I prevent npm from storing cache data?
You can change the cache location, but disabling caching entirely is generally not recommended for normal development. Caching helps reduce repeated downloads and can improve installation performance.
A better approach is to monitor the directory and clean it when necessary.
11. Does npm cache contain my source code?
The npm cache primarily stores package-related and HTTP cache data. It is not intended to be a backup of your application source code or project files. Your source code normally lives in your project directory.
12. Does uninstalling Node.js automatically delete npm cache?
Not necessarily. The cache directory can remain on your computer even after uninstalling Node.js, depending on the uninstaller and installation method. If you want to reclaim that space, check the actual cache location separately.
Conclusion
An npm cache folder that consumes several gigabytes of storage is not necessarily a sign that something is wrong with Node.js or npm.
It is largely a result of how npm manages downloaded package data. The cache helps developers avoid repeatedly downloading the same resources, but it can accumulate over time because npm does not automatically impose a general size limit or routinely remove all cached data.
If you are experiencing this issue, start by checking the configured cache location with:
npm config get cacheThen run:
npm cache verifyIf you still need to reclaim more disk space, use:
npm cache clean --forceYou can also move the cache to another drive if your system drive has limited storage.
Most importantly, understand the difference between npm’s cache and your project’s node_modules directory. Deleting the wrong folder can create unnecessary work.
For developers who regularly work with multiple applications and want a broader view of storage usage, a dedicated storage tool such as Oualator Storage Doctor can also make identifying unnecessary files easier.
With the right cleanup approach, you can reclaim disk space without unnecessarily disturbing your Node.js development environment.
Related storage guides: