Image resizing is something that everyone gets involved in, whether you are a daily macOS user or a blogger, designer, student, marketer or any other person from the digital content world. Be it preparing images for a website, resizing for email, or changing dimensions for social media, Mac has some fast, deed tools baked right in — no additional software needed. In this ultimate guide, learn how to resize an image in Mac using different native methods, as well as some advanced tips to maintain quality, resizing in bulk, and achieving a professional output.
Why You Might Need to Resize Images on Mac?
Before jumping into the steps, let’s understand why resizing is important:
- Improve website loading speed
- Meet social media size requirements
- Reduce storage space
- Prepare images for printing
- Attach smaller files in emails
macOS includes excellent built-in tools that let you resize photos in seconds.
Method 1: Resize an Image in Mac Using Preview (Best Option)
Preview is the default image viewer on macOS and surprisingly powerful.
But before we delve into the steps, let us first understand the significance of resizing:
- Improve website loading speed
- Meet social media size requirements
- Reduce storage space
- Prepare images for printing
- Attach smaller files in emails
There are also some great built-in tools in macOS that allow you to resize your photos in a matter of seconds.
Preview — macOS’ default image viewer and surprisingly powerful.
Step-by-Step Guide:
- Open the image with Preview
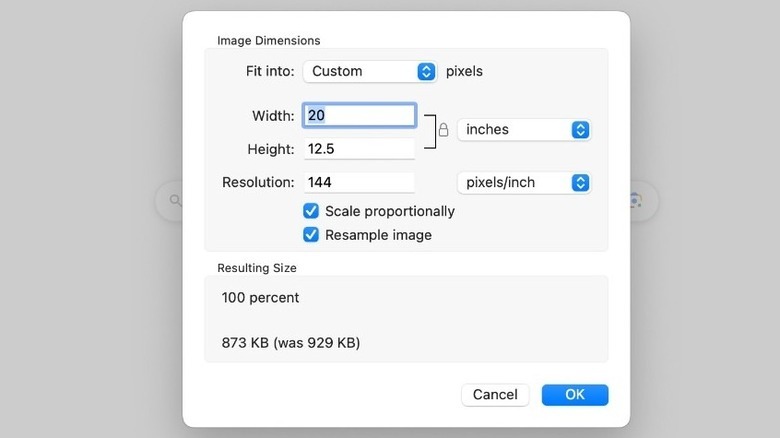
- Click Tools → Adjust Size
- Set new dimensions (pt, px, % or in)
- Keep “Scale proportionally” checked
- Click OK
- Save the file
Why Preview is Great:
- Built into macOS
- Lossless when used properly
- Supports multiple formats
- Extremely fast
In most cases, Preview is the best bet for users learning how to resize image in Mac. Likewise, you can related blog on how to resize an image in Snapseed.
Method 2: Resize Images Using the Photos App
If your pictures are stored in Apple’s Photos app. Resizing Works here too no matter where your photos are stored. Just open it right up.

Steps:
- Open the Photos app.
- Pick a picture.
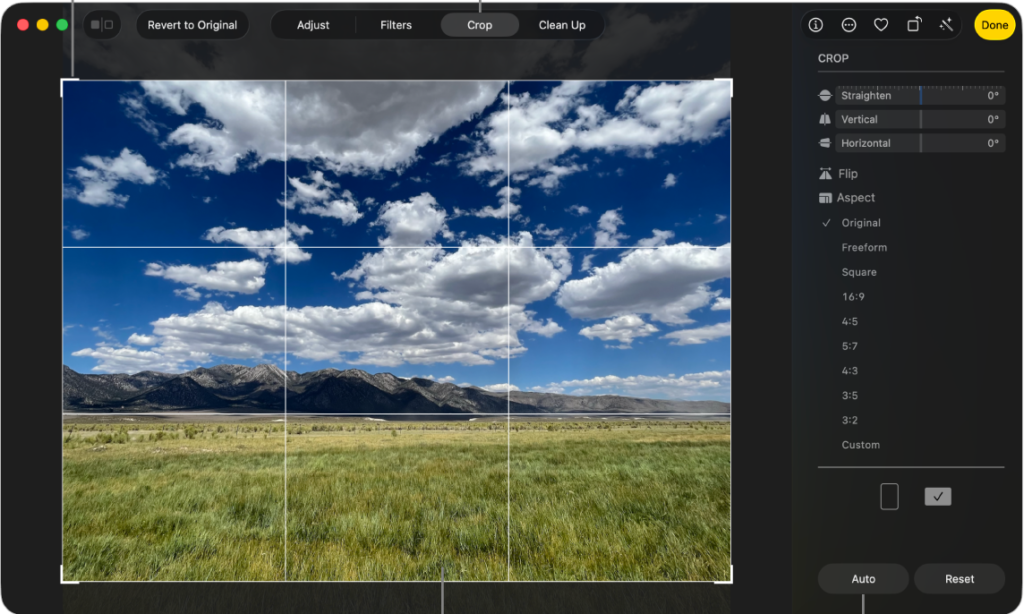
- Click “Edit.”
- Use the Crop & Adjust tools to resize it.
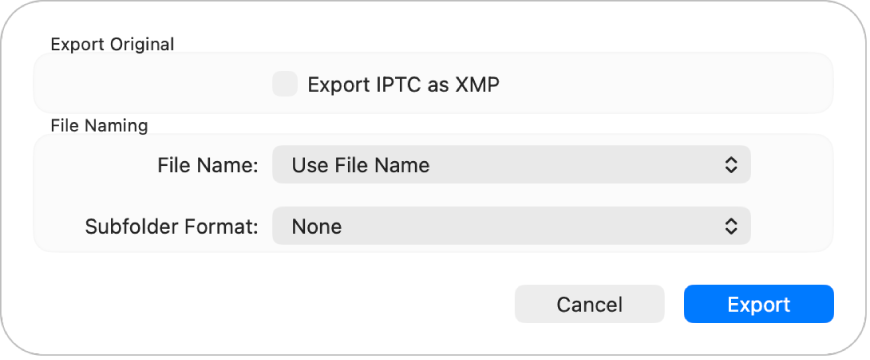
- Click File → Export. The result is at full resolution within a format designed for pictures that you can work on further if need be.
- Choose the desired size from the menu.
Method 3: Batch Resize Multiple Images at Once
Light editing and basic color correction tasks can be performed in Apple’s Photos app quickly and easily, even for synced photos of already organized photo libraries. So, whether you have hundreds of images in need of cropping from the iPhone sync? Mac just makes this easy.
How to Do It:
- Open the Finder and select some images.
- Right-click and select “Quick Action” → Convert Image.
- Choose the size (Small, Medium, Large or Custom)
- Click this to convert.
It’s Ideal for:
- Sharing photos on your web site or e-mail
- Bundling together social media
- Compression of photo files
- This is one of the fastest ways on how to resize image in Mac.
Method 4: Resize an Image in Mac Using Screenshot Tool (Quick Cropping Trick)
If you may want to resize only a portion of the image. Here are the steps:
- Press Command + Shift + 4
- Select the area you want
- macOS saves resized section automatically
Great For:
- Cropping screenshots
- Quick social media posts
- Trimming large photos
Best Image Size Tips for Quality
| Use Case | Recommended Size |
| Website | 1200–2000px width |
| 1080×1080 | |
| Facebook cover | 820×312 |
| Under 1000px | |
| 300 DPI |
Never forget about aspect ratio as it will make your image look distorted
Advanced Quality Settings in Preview
Inside Adjust Size, you’ll see:
- Resolution (DPI)
- Width & Height
- Image smoothing
Pro Tips:
- Lower DPI for web
- Higher DPI for print
- Avoid stretching small images upward
Common Mistakes to Avoid
- Resizing repeatedly (causes blur)
- Ignoring aspect ratio
- Enlarging tiny images
- Saving low-quality JPEG repeatedly
Which Method Should You Use?
| Need | Best Tool |
| Single image | Preview |
| Photo library | Photos |
| Bulk resizing | Finder Quick Actions |
| Quick crop | Screenshot tool |
How to Resize an Image in Mac (Free & Super Fast Alternative)
For Mac users needing to crop an image in a jiffy — without launching any heavy-weighted editing software — there is also better way to get it done.
Yes, macOS has built-in utilities such as Preview that can resize photos, and they get the job done for simple jobs. Sometimes, however, you want to avoid these export settings, quality sliders, or repeating steps — particularly when you need to resize multiple images.
This is where the Oualator Free Image Resizer shines all.
This is a no-frills, browser-based solution to resize your images right away — no downloads, no logging in, no watermarks. Simply upload your photo, enter your new size (or scale by percent), and in a few seconds download a resized version of your photo.
Perfect for Mac users who want speed, simplicity, and professional output.
Why Mac Users Love This Online Resizer?
Macs built-in tools may do the helpful, but this online choice eliminates all the friction:
- Completely free without an account
- Resize by custom width & height as well as by percentage
- Supports JPG, PNG, and WebP files
- Processing within seconds — absolutely NO waiting time
- Simple, intuitive UI (awesome for beginners)
- No watermark ever
- Truly Mac and iPhone and iPad-native
When This Tool Beats Native Mac Apps?
Mac tools are nice — but this web resizer is typically quicker and simpler for the majority of image resizing jobs.
Faster for Simple Resizing
Upload → Resize → Download; Instead of opening Preview, duplicating files, adjusting size and exporting. Done.
Truly Free Without Limits
No locked features. No premium upgrades. Resize numerous pictures in their unique quality.
Zero Learning Curve
No menus, no settings confusion. Any photo that you can upload, you can resize.
Ideal for Bloggers, SEO Work & Bulk Tasks
If you regularly resize images for sites, posts or social media, this tool is a real time saver over desktop editing.
Mac Built-In Tools vs Online Resizer — Which Should You Use?
Use built-in apps in Mac when you need to:
- Resize without range of minor edits
- Cropping, directly drawing or coloring adjustments
- Offline editing
When to use the resizer online:
- Fast resizing only
- Clean output without watermark
- Bulk or repetitive resizing
- The quickest possible workflow
Best Approach? Use Both Smartly
Think of it like this:
#1: It will make it easier to use editing and editing tools in Mac
#2: For fast resizing the online resizer will do the trick
Which gives you the strength of Mac — not to mention the quickness of a dedicated resizing tool.
Final Thoughts on How to Resize an Image in Mac
And that is how to resize an image in Mac without any third-party apps, using built-in macOS tools — Now you know! Editing a single photo or hundreds, it is ridiculously efficient on Mac.
Learning how to resize an image in Mac will save your space, speed up your website and help keep your visuals looking professional. After a couple times of doing it, resizing becomes second nature.
If your life revolves around images, then Preview + batch resizing will be your new workflow double-act.
Frequently Asked Questions
Q. How do you shrink an image on a Mac, easily?
Ans. If you want to quickly resize an image on your Mac, the Preview app is the simplest tool to do so. Simply open the image in Preview, go to Tools → Adjust Size, type in the new dimensions, save, and call it a day.
Q. Is there a way to batch resize images on a mac?
Ans. Yes! On macOS, you can batch resize images using Finder Quick Actions. In the Photos app, select the images that you want to resize, right-click, select Quick Actions → Convert Image, and choose a size — any selected images will be resized in a batch.
Q. Does resizing an image on Mac reduce quality?
Ans. Downsizing (making the image smaller) is generally done well. But if we increase the size of an image too much, it will turn blurry or pixelated since the previous details cannot fill the new size.
Q. Using the Mac Photos App to Resize Images Why the Mac Photos App?
Ans. For those wondering, yes — you can resize images in the Photos app as well. Edit a photo and exporting it using File → Export to your preferred size and quality, and save.
Q. How to Resize an Image on Mac and What Size Image to Use for the Web?Ans. Large images such as banners should be about 1200–2000px wide and regular photos around 800–1200px wide for the web. Do not forget to keep aspect ratio locked to avoid distortion.
A technical content writer specializing in in-depth tech blogs, she tracks evolving technologies and industry shifts. Before writing, she leverages advanced tools for research and validation. Constantly updating her knowledge, she delivers accurate, trend-driven, and future-ready content for digital audiences.