If you are working with logos, posters, social media creatives, or print designs, resizing images is something you will do almost daily. Many beginners are perplexed because Adobe Illustrator works differently from Photoshop. In this guide, I’ll show you how to resize an image in Illustrator in a straightforward, practical manner that avoids unnecessary complications. Simply follow the steps slowly, and you’ll get it right.
Why Does Resizing Images in Illustrator Feel Confusing at First?
Although Illustrator is a vector-based software, the majority of the images you import are raster images, such as JPG or PNG. That is why resizing behaves a bit differently. When you understand selection tools, bounding boxes, and scale options, things start to make sense. Once you learn how to resize an image in Illustrator, you will also avoid blurry exports and weird stretching issues. On the other side, you can go through the article on how to resize an image in PhotoShop.
Step 1: Open the Document and Insert the Image
First, set up Adobe Illustrator and load your document.
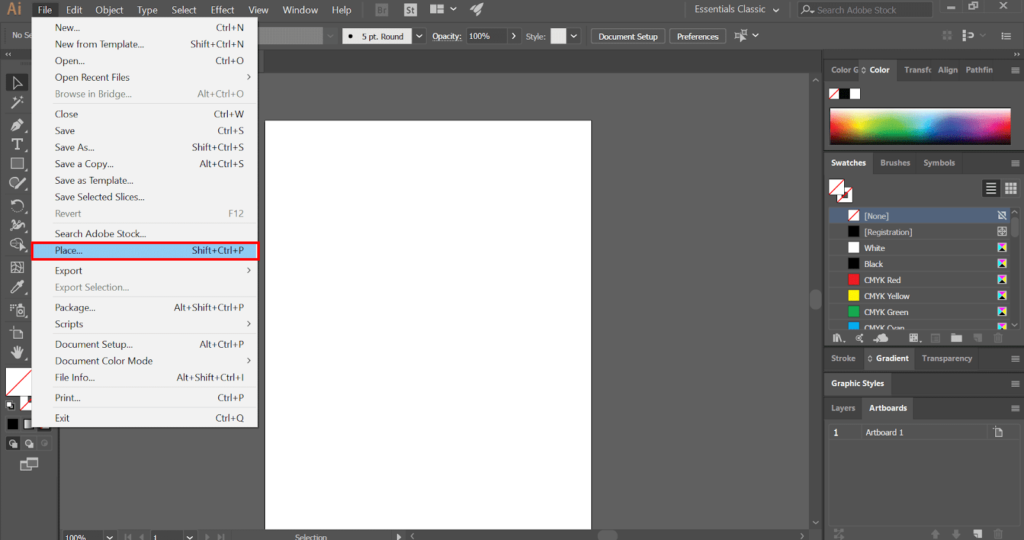
Now go to:
- File → Place
- Choose the image you want to resize
- Click Place, then click once on the artboard
At this stage, the image is selected but not resized yet.
Tip: Do not drag randomly while placing if you want the original size. Just click once.
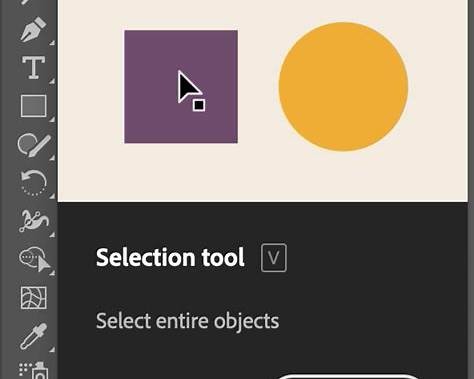
Step 2: Select the Image Correctly
Selection is important. Many people accidentally select the artboard or a clipping mask instead of the image.
- Use the Selection Tool (V) from the toolbar.
- Click directly on the image.
- A blue bounding box should appear around it.
If you do not see a bounding box, go to:
View → Show Bounding Box
This step is essential when learning how to resize an image in Illustrator properly.
Step 3: Resize using the Bounding Box
This is the most common and easiest method.
- Click on any corner handle of the bounding box.
- Hold Shift to keep proportions locked.
- Drag inward to reduce size or outward to enlarge.
Holding Shift is very important. Without it, the image will stretch and look bad. Trust me, everyone has made this mistake at least once.
If you are resizing often, this method becomes muscle memory.
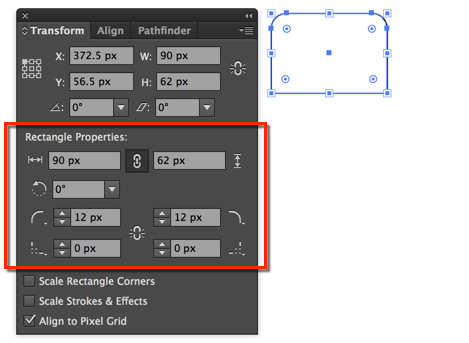
Step 4: Resize with the Transform Panel for Accuracy
Sometimes you need exact dimensions, especially for print or social media sizes.
Go to: Window > Transform
In the Transform panel, you will see Width and Height values.
- Make sure the chain icon is locked.
- Enter the desired width or height.
- Press Enter.
This method is very precise and is often used by professionals who know how to resize an image in Illustrator without guessing.
Step 5: Resize using the Scale tool
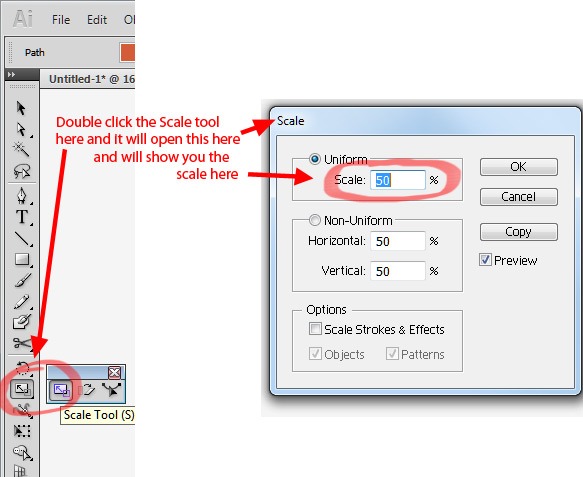
The Scale Tool gives you more control.
- Select the image.
- Press S on your keyboard.
- Click once on the image.
- Enter a percentage value like 50% or 120%.
- Click OK.
This is useful when resizing multiple images consistently.
Once you understand this method, how to resize an image in illustrator becomes less intimidating.
Step 6: Resize without Losing Quality
This part is very important.
Illustrator does not magically improve image quality. If you enlarge a low-resolution image too much, it will look pixelated. Always check the original image resolution before resizing.
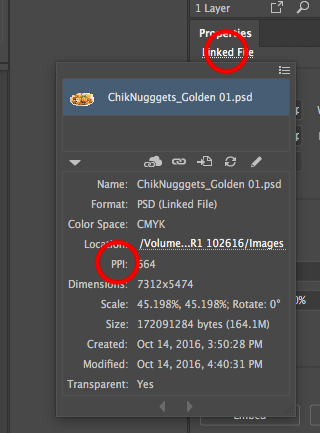
To check:
- Select image
- Go to Window → Links
- Look at the effective PPI
For print, aim for 300 PPI.
For web, 72 to 144 PPI is usually fine.
Knowing this saves you from embarrassing print results later.
Step 7: Resize Images inside Clipping Masks
Sometimes images are inside shapes.
- Double-click the image to enter isolation mode.
- Resize the image inside the mask using corner handles.
- Double-click outside to exit.
Many beginners think Illustrator is broken here, but it is just masking behaviour. This step often confuses people learning how to resize an image in Illustrator for the first time.
Common Mistakes to Avoid
Here are a few things that mess up resizing:
- Not holding Shift and stretching images
- Resizing the frame instead of the image
- Ignoring resolution warnings
- Scaling up tiny images for large prints
Avoid these, and your designs will instantly look more professional. Once you understand how to resize an image in Illustrator, these mistakes naturally disappear.
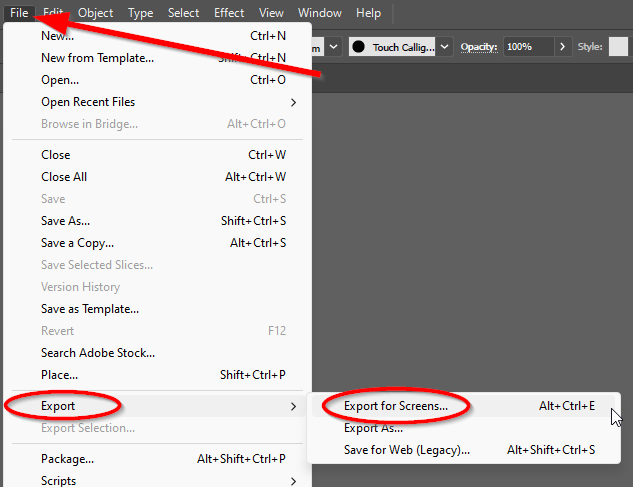
Exporting after Resizing an Image in Illustrator
Always make sure to export correctly after resizing.
For Web:
- Choose File → Export, then Export As.
- Pick between PNG and JPG.
- Select the resolution and quality.
For Printing:
- Choose File → Save As → PDF.
- Use a high-quality print preset.
If the export settings are incorrect, even good resizing is useless.
Resize One or More Images Without Using Adobe Illustrator
If you don’t have Adobe Illustrator installed or prefer a faster, browser-based solution, Oualator Image Resizer is an excellent tool for resizing images online. For simple image resizing, this online tool provides a quicker and easier solution than Adobe Illustrator.
It works directly in your browser, so you don’t need to install complicated design software to get results quickly. It’s especially useful if you need to quickly resize images for the web or social media, use a low-end device, or work on a shared computer. How to use this utility to resize an image:
- Visit the tool at its official website.
- To insert one or more images, click on the Upload Image button.
- Next, enter the desired width and height or choose the available default size.
- Now, to avoid image distortion, turn on the Maintain Aspect Ratio option.
- Next, click on the Resize Image button to begin processing your image file.
- Finally, instantly download the resized image to your device.
Why is Oualator a Viable Alternative to Adobe Illustrator?
- There is no need to install any software or have an Adobe subscription.
- Allows for batch resizing of multiple images in the same session.
- Works perfectly on low-end devices and slow systems.
- Ideal for quick turnaround tasks such as banners, thumbnails, and blog images.
- This online application supports popular file formats such as JPG, PNG, and WEBP.
- This tool supports workflows for social media, the web, and publishing content.
- Also, it keeps image quality intact while decreasing file size.
- Non-designers who don’t need Illustrator’s advanced tools will find it useful.
- It’s completely free and accessible from anywhere.
While Adobe Illustrator is still the best option for professional design, vector editing, and print-ready assets, this tool is an excellent choice for basic image resizing when speed, simplicity, and accessibility are important.
Final Note
Resizing images in Illustrator is not difficult; it simply differs from Photoshop. After some practice, the process becomes clear. You’ll learn to resize images in Illustrator using bounding boxes, the Transform panel, scale tools, and masks. Practise on sample files, and it will come naturally.
A technical content writer specializing in in-depth tech blogs, she tracks evolving technologies and industry shifts. Before writing, she leverages advanced tools for research and validation. Constantly updating her knowledge, she delivers accurate, trend-driven, and future-ready content for digital audiences.