If you are working on a quick graphic, a school project, or a basic website image, Microsoft Paint is still one of the easiest tools around. You do not need Photoshop, a fancy tool, or any design background for resizing images. This guide walks you through how to resize an image in Paint in a clear, no-stress way, with step-by-step visuals and real use cases.
Paint comes free with Windows, opens fast, and gets the job done. That is why many people still rely on it, even in 2026.
Why Use Paint to Resize Images?
Before jumping into the steps, let us be honest for a second. Paint is not advanced. But for resizing images, it works surprisingly well.
Here is why people prefer it:
- No learning curve at all
- Already installed on most Windows systems
- Perfect for basic resizing needs
- No internet or login required
If your goal is just resizing and not heavy editing, learning how to resize an image in Paint saves time and effort.
Step 1: Open the Image in Paint
First things first, you need to open your image inside Paint.
There are two easy ways:
- Right-click on the image file, select Open with, then choose Paint.
- Or open Paint first, click File, then Open, and select your image
Once opened, your image will appear on the Paint canvas.

Take a moment here and check that the image is correct. Paint does not autosave, which is actually good in case you make a mistake.
You may check the other article on How to resize an image in Photoshop.
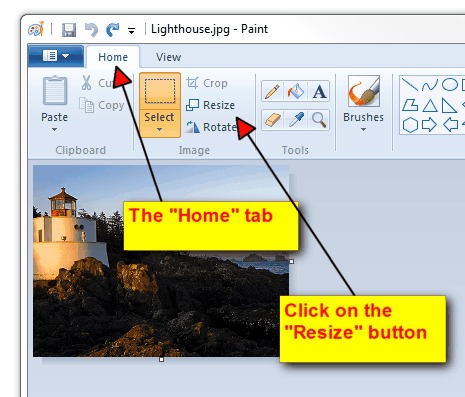
Step 2: Locate the Resize Option
Now look at the top toolbar. You will see a button labelled Resize.
This is usually found under the Home tab, right next to Select and Crop.
Click on Resize. A new dialog box will open.
This dialog is where all the resizing magic happens. If you are learning how to resize an image in Paint, this is the most important screen.
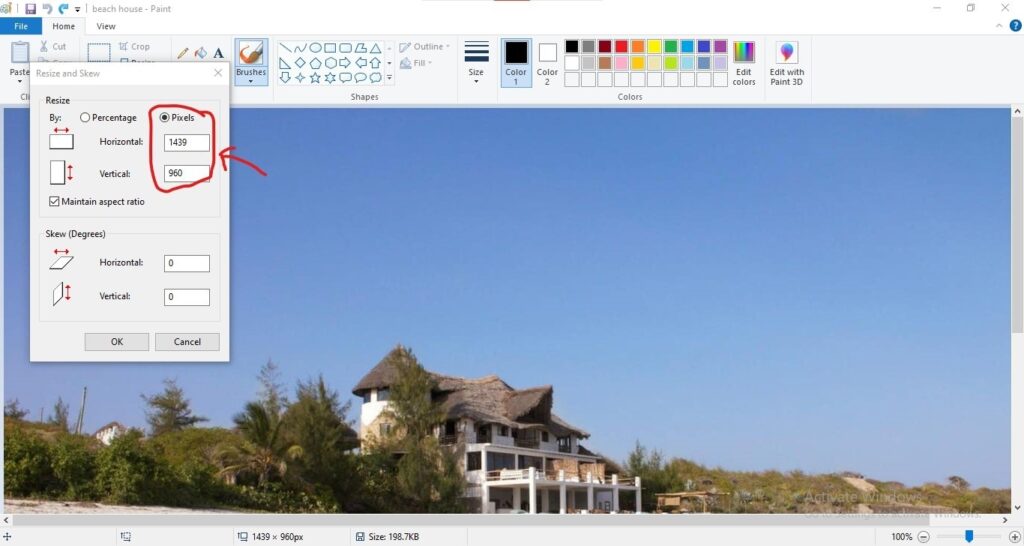
Step 3: Select Resize Image by Percentage or Pixels
Inside the resize dialog box, you will see two main options that will help you to resize the image accurately:
- Percentage: The percentage option is good if you just need the image size smaller or larger without worrying about the exact size scale.
Example: Setting 50 percent reduces both width and height by half. - Pixels: Pixels are best when you require a specific size, like 800×600 or 1200×630 for a website or blog. You should make sure that the box saying “maintain aspect ratio” is checked correctly. This avoids the image from weird stretching.

Most beginners mess up here by unchecking the aspect ratio. Do not do that unless you really want a distorted image.
Step 4: Enter New Dimensions Carefully
Now enter your new width or height.
If the aspect ratio is on, you only need to change one value. The other updates automatically. Paint handles the math for you.
For example:
- Original image: 2000 x 1500
- New width: 1000
- Height auto-adjusts to 750
This step alone solves 90 percent of resizing problems. Once you understand this, how to resize an image in Paint becomes almost effortless.
After entering values, click on the OK button. Your image will be instantly resized on the canvas.
Step 5: Properly Save the Resized Image
Now, do not just close Paint. You need to save the resized image correctly.
Click on the image file, then choose:
- Save As will preserve the original image.
- If you wish to overwrite the original image, click on Save.
Choose the file format:
- For quality and transparency – PNG
- For a smaller file size – JPEG
- If the quality matters more than size – JPEG

This final step completes the process of how to resize an image in Paint from start to finish.
Common Mistakes to Avoid
Many people say that Paint ruins image quality. That is only half true. Most issues come from mistakes.
Avoid these:
- Upscaling small images too much
- Turning off the aspect ratio
- Saving repeatedly in JPEG format
- Resizing the same image again and again
Paint works best when used gently. Resize once, save once, done.
When Paint Is Not the Right Tool
The paint tool is great, but not always ideal for image resizing.
Do not use it if:
- You need batch resizing
- You want advanced compression control
- You are editing professional photos
But for students, bloggers, office work, and quick edits, learning how to resize an image in Paint is more than enough.
Bonus Tip: Resize Using Drag Handles
There is another way, although less precise.
You can drag the small squares at the corners of the image on the canvas. This resizes visually.
It is fast, but not recommended for exact dimensions. Still, it’s useful for quick drafts or rough resizing.
Resize a Single or Multiple Images Without Using MS Paint
If you don’t have any advanced editing tools installed and prefer a simple, built-in solution, MS Paint is a practical tool for resizing images on Windows easily. It comes preinstalled on most PCs and is useful for quickly resizing images without a learning curve. For users who want an even faster, browser-based online option, or if you need to resize multiple images at once, Oualator Image Resizer works as the best alternative.
Below is how you can resize an image using Oualator when MS Paint is not convenient:
- Visit the site and open the tool.
- Next, click on the Upload Image button and select your image to resize
- Now, enter your desired width and height or select a default size.
- Now, enable ‘Maintain Aspect Ratio‘ to avoid stretching or distortion.
- Tap on the Resize Image button to resize the image.
- At last, download and save the image to your device.
This method is useful if you’re working on a shared computer, a mobile device, or want to get results faster than opening MS Paint repeatedly.
Why is Oualator a Better Choice Than MS Paint?
- It supports batch image resizing, unlike MS Paint.
- This alternative does not have system dependency; it works even on low-spec devices.
- Also allows resizing without the need to open or save project files manually.
- This is ideal for content creators, bloggers, and social media managers.
- This maintains the consistent output dimensions across multiple images.
- It also helps to keep quality while resizing for web performance.
While MS Paint is perfect for basic offline resizing on Windows, this site offers added flexibility and speed for users who need online access, batch processing, or cross-device compatibility. It is well-suited for users who want a simple, efficient tool instead of advanced editing options.
Final Thoughts
Microsoft Paint may appear to be out of date, but it still delivers where it matters. If your goal is quick resizing without stress, this tool is perfect.
Once you practise a few times, how to resize an image in Paint becomes second nature. No tutorials needed after that, just muscle memory.
And honestly, sometimes simple tools are the best tools.
An experienced technical content writer with expertise in crafting insightful technology blogs. He studies emerging trends, analyzes tools before drafting, and ensures every piece reflects the latest innovations. His content blends clarity, research, and up-to-date technical understanding.